I'd love to hear how you are getting on with the Fashion Fix projects and the blog in general. I really want it to be useful as well as inspirational. Do leave me a comment in the comments box below or email me at fixuplookchic@gmail.com
Harriet

Sunday 30 June 2013
Dinosnores: a great night out

Following a relaxing week in Devon was a raucous weekend in London with Ros for her birthday surprise.
at the National History Museum
Highly recommended even if you don't know your diplodocus from your triceratops.
Best of all, Ros won these brilliant dino tattoos in the raffle...we continued to sport them for the rest of the weekend, I've become rather fond of mine stomping down my arm and I have never been too enamoured with tattoos, in spite just finishing a draft of a sailor girl commission this evening for my friend Al...That is going under the needle in a few weeks and results will be posted here. This is the fourth I've done for him, it's a bit like having a human sketch book.
If you were going to have a tattoo what would it be, and - perhaps more importantly - where would it go?
Friday 28 June 2013
The Great Escape
 |
| 'Shepherds Delight' |
 |
| The 'lake' |
 |
| Ant at the lens |

Thursday 20 June 2013
Fashion Fix: Boyfriend Birthday Special...Monogramming Initials

I've had to keep this post under wraps as it's my boyfriend's birthday present! This post will probably embarrass him horribly, but ever since spying this cutting in the Sunday Times Style magazine I was hatching a plan...

Like they say in the Times, the obsession with engraving your initials onto possessions has both a nostalgic quality and a way to add personal value to any item. My friend Bianca had already branded hers and Polly's brollies and I was keen to follow suit. All this takes is a bit of embroidery thread and the knowhow with a few choice embroidery stitches.
I chose bright colours to contrast with the pale linen colours of the shirts.
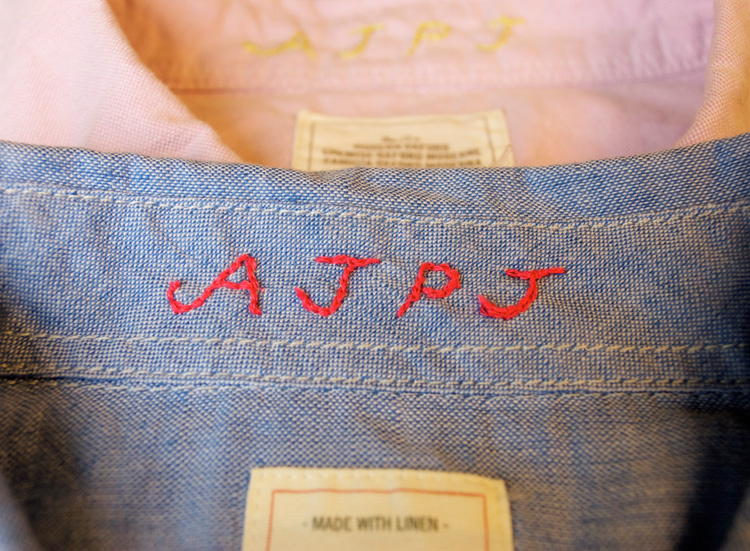

Here are diagrams of a few of my favourite simpler embroidery stitches good for monogramming. Use four strands of your embroidery thread for a chunky 'font'.
 |
| Chain Stitch |
 |
| French Knot. Useful for full stops between initials |
 |
| Split Stitch, I used this one for Ant's shirts. |
 |
| And it all went in a box lined with that amazing wallpaper! |
Fashion Fix: Doily Clutch Bag
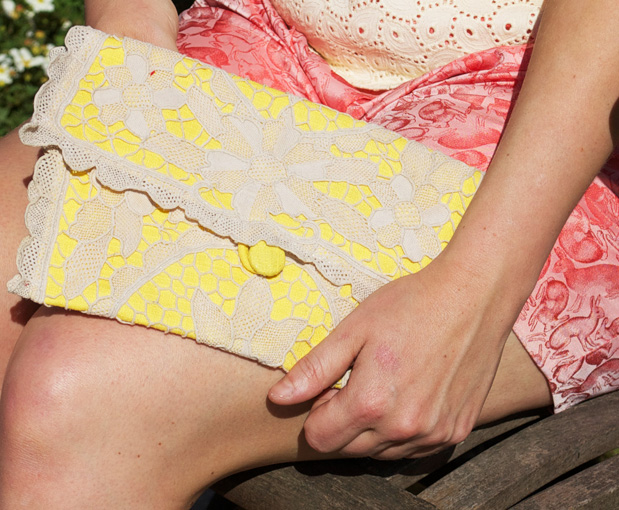
The problem with doilies...no one of our generation really knows what to do with them!
Ros masterminded this gorgeously surprising take on a clutch bag using the humble doily. If they aren't adorning your granny's sidetables, head on down to any vintage shop or fair and snap them up for a bargain.
You will need:
- Rectangular Doily
- Backing fabric
- Lining fabric
- Clear thread
- Button
- Cord for rouleau loop
How to:
- Using a running stitch sew your doily onto the backing fabric.
- Cut the away the excess backing fabric. Snip as close to the stitches as possible.
- Next, cut a rectangle from the lining fabric. Turn under and press all four sides so the lining is the same size as the backing fabric.
- Sew a small pocket into the lining fabric before attaching it to the doily.
- Pin the pressed lining fabric to the inner side of the doilies and sew all four edges.
- Fold the doilies in 3, creating the bag and flap. Sew up either side.
- Add a button and loop to finish. (See box out ‘How to make Rouleau Loop’)


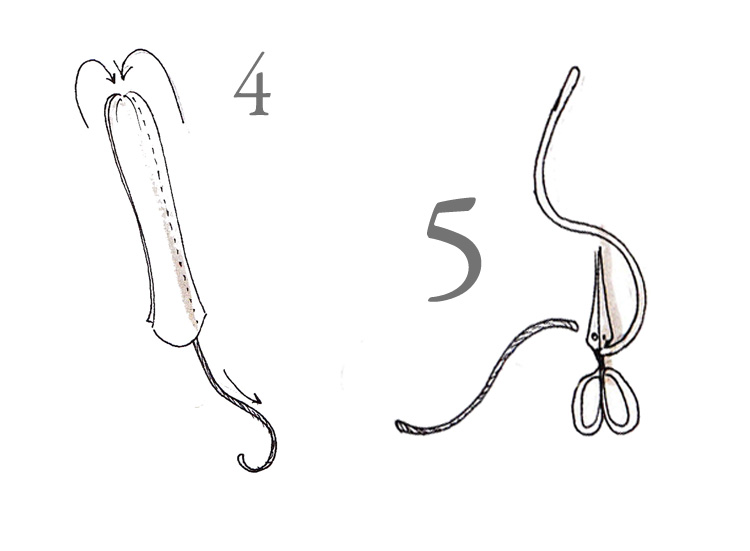
How to make a Rouleau Loop
- Cut a strip of your chosen fabric on the bias. It needs to be 4 x the width of your cord
- Sew a length of cord at one end of the strip.
- Fold the strip in half, encasing the cord and, using a zipper foot, sew a running stitch all the way along the strip.
- Pull the end of the cord and ease the fabric in on its self. This will be slightly fiddly and you may need to use a knitting needle at one end to start it off.
- Once the fabric has been pulled all the way through, cut off the cord. You now have your Rouleau loop.

Wednesday 19 June 2013
Classical sculptures dressed as hipsters


Just found on Today I Learned site an incredible juxtaposition of cultures that is so wrong it's right!
Photos by photographer Léo Caillard and photo retoucher Alexis Persani and originally blogged by Today I Learned, putting it beautifully: "Classical sculptures dressed as hipsters look contemporary and totally badass"
Monday 17 June 2013
Cloth Issue 19

Cloth Issue 19 hit the shops a few weeks back and as usual, you can find some brilliant projects from Ros and myself inside.

Highlights include, this incredible plastic spoon necklace; a wrap bikini top, pimping four pairs of pumps, silk scarf top and our usual fashion fixes.
Easton Arts Trail
 |
| We were lucky enough to walk past this brilliantly bonkers Flamingo garden during a gap in the downpour. |
 |
| Ros and Catherine - our very own Easton Installation |
Following a rather big night at Belle and Grant's supper club at 40 Alfred Place, Ros and I found some wholesome fun wandering around the Easton Arts Trail on Sunday. We gathered up our very talented friend, Catherine and had a good old snoop into the weird and wonderful front rooms of Easton's Artists.
Saturday 15 June 2013
Reading Room: Cressida Bell's 50 Fabulous Cakes
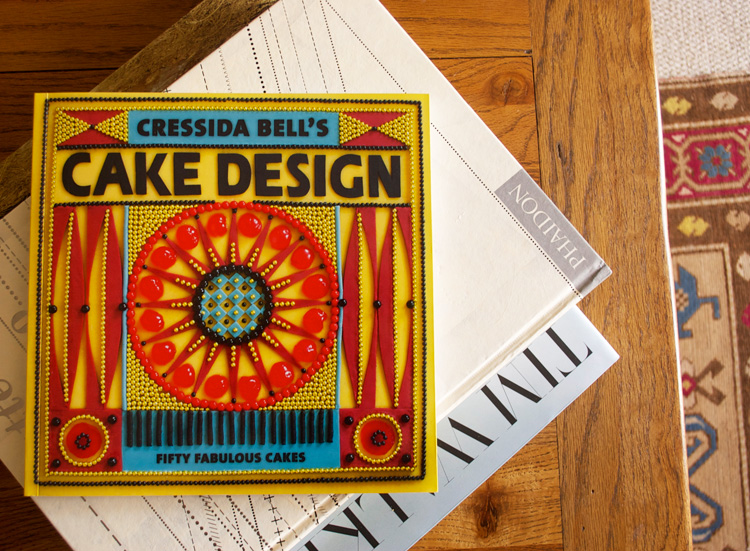
Books are a huge inspiration. No surprise there, but it is often the unlikely sources that give me the greatest pleasure. Therefore I am starting a new 'bookspiration' feature and what better way to start than with CAKE.
I assure you this is a design focussed post.
Whilst in product design, fashion, interiors, the standards have been constantly raised with groundbreaking ideas and techniques, the world of cake decorating has remained pretty twee and nostalgic. Cressida Bell, a descendant of the print obsessed Bloomsbury Group admits she is no baker, but when it comes to cake decorating, she approaches it with the focus of a high end product designer. Taking inspiration from fabrics and wallpapers, her cakes are simply inspiring. Here are some of my favourites.


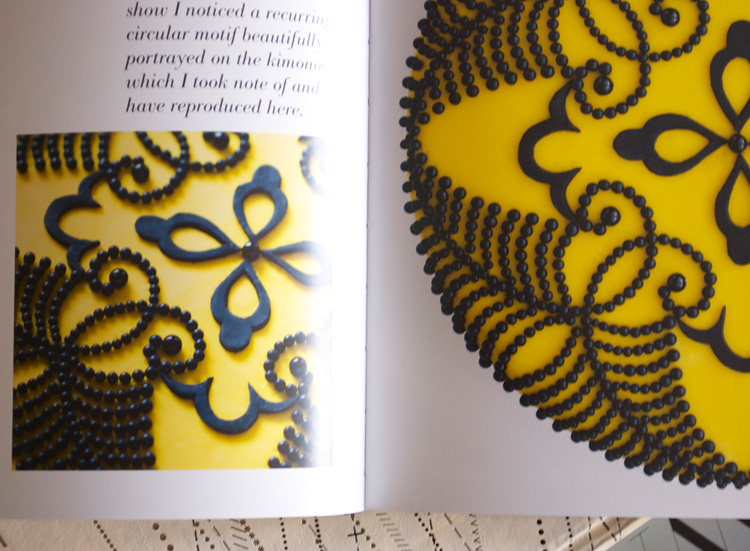
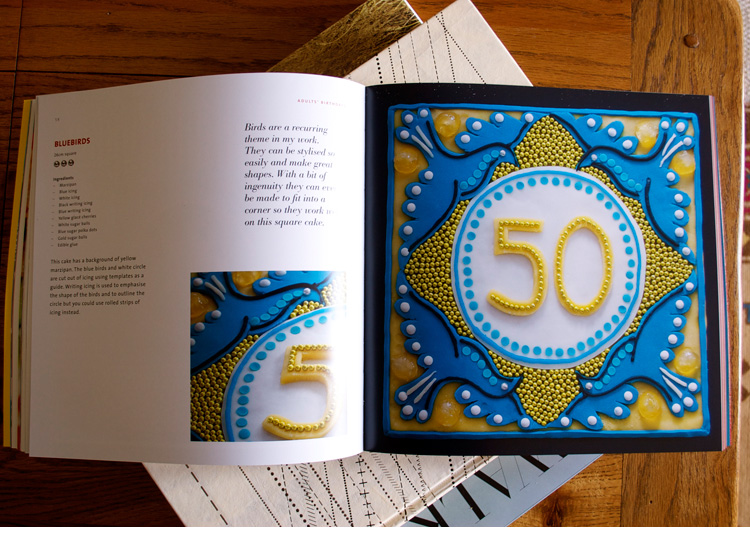
Cressida Bell’s Cake Designs: Fifty Fabulous Cakes (Double-Barrelled Books, £25) Commissions taken at Cressida Bell
Photographs by Sonja Read
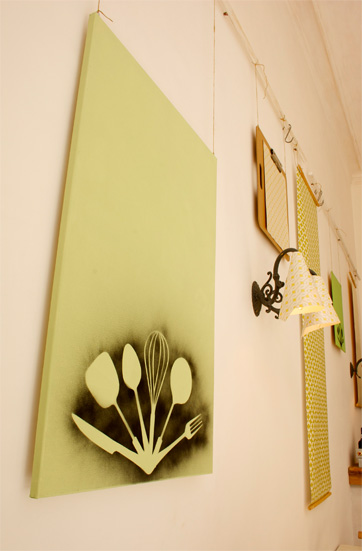
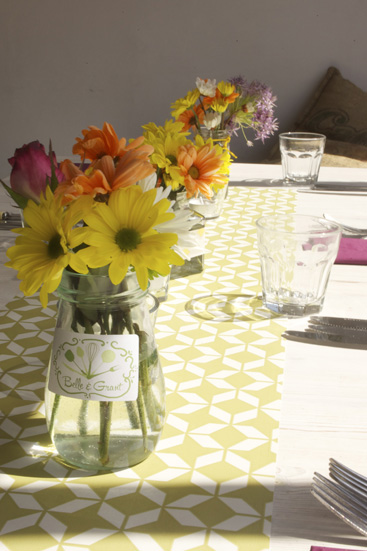
Belle and Grant Pop up at 40 Alfred Place

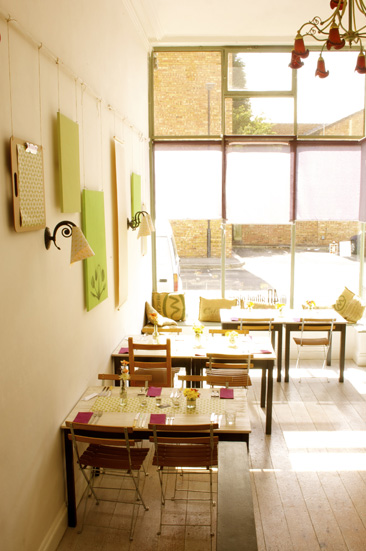
This weekend I had the pleasure of designing 40 Alfred Place for the Pop Up Restaurant 'Belle and Grant'. A sumptuous Spring/Summer Menu that brought out the seasonal freshness in my design inspiration...and it just so happened that I had some of that green wallpaper left over from the Wooden Box Restoration.
I wanted to share some pictures of the space and share a few lightbulb moments I had on the subject of temporary interior design. So many of us rent, but still want to make our mark on our habitats without breaking the bank and upsetting the landlord.
Instead of picture rails the space had high suspended horizontal batons which were easy to hang pictures off. Keeping with the fresh and wild theme, I hung canvases painted all shades of green with hessian string.

For Belle and Grant specifically, I was into a subtle branding of the company to remind the customers who was cooking for them, so I made a scaled up stencil of their logo, a cluster of cooking utensils, and sprayed it onto sporadic canvases. I also printed labels out of the logo and put them onto the assorted jars of flowers on the tables.
As well as the canvases, I utilised the remaining wallpaper from the B&Q box project as well as finding another cracking roll in none other than Wilkinsons! I stapled batons to the top and bottom of varying lengths and hung them in and amongst the canvases. I also clipped a square of each onto plain clip boards for an added item to hang.
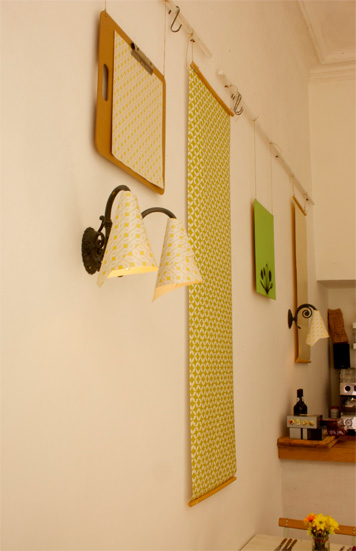
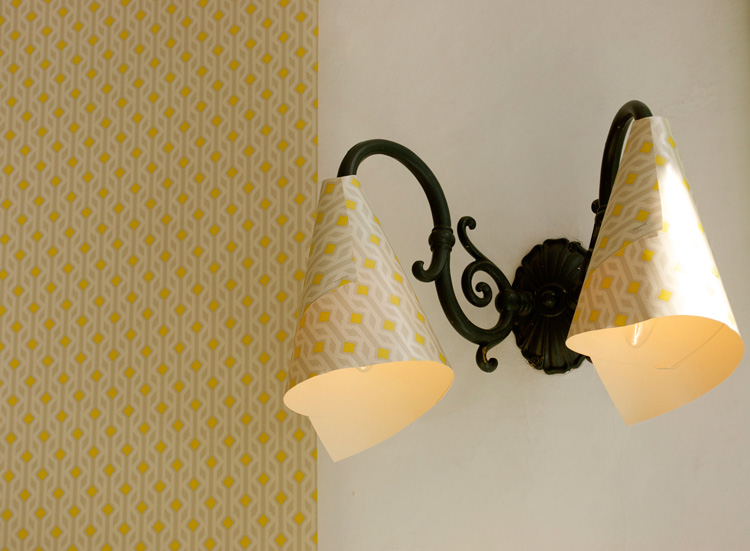
Usually, the lights are bare and exposed in the space, so I used wallpaper for a further measure in creating cone lampshades. Stapled into shape and slotted over the existing fixing, just make sure the paper is well away from the bulb.
Wallpaper also featured as a table runner, and the best thing about this is, no matter how messy the customers on the Friday night, there is plenty of wallpaper left to make a new runner for the Saturday night crowd!
Home is where the art is: wooden box restoration

A large number of the items in my flat are the result of upcycling projects and pieces I found in skips, and tips in need of a good home. I felt it would make perfect sense to add these projects to the blog.

I found this box in a skip in a rather affluent area of town. As well as the box, I acquired a printed wine box, a wooden sewing box complete with full vintage sewing kit, and two ornate terracotta planters. Having a van is a curse as well as a gift, as you have no excuse not to pick these things up and breathe new life into them!
What particularly drew me to this box was it's rather odd curved hinged lid.
You will need:
- Sand paper
- Wood paint (satin finish)
- Primer in complimentary colour
- Paint brushes
- White spirit if paint is oil based
- Wall paper/lining paper
- Spray mount
- Clear varnish
- Pencil
- Tape measure
- Scissors
- Felt to cover the base
- All purpose glue
- Fixtures and fittings for the box: Hinges, safety latches, handles. I chose ornate brass ones
- Drill for adding fixtures and fittings.
How to do it:
- Clean and sand the box inside and out. I also removed the rusty hinges and cleaned the area.
- Paint two coats of primer, leaving to dry in between each coat.
- Paint two coats of Wood paint, leaving to dry in between each coat.
- line the inside of the box by carefully measuring each face, cut out your pieces of paper, spray mount and glue in place.
- trim excess edges.
- Seal the lining paper by adding a coat of varnish over the top
- Measure, mark out and add your fixtures and fittings.


Materials Details
Wood Primer from B&Q: Colour 'Grey'
Satin Base Wood and Metal Paint from Valspar (supplied and mixed by B&Q): Colour 'A Night at Ice Castle'
Wallpaper from B&Q
All fixtures and fittings from B&Q
Felt from Fabricland
Thursday 13 June 2013
Fashion Fix: Moschino Jacket Bias Binding Masterclass
 |
| a style that works for both guys and gals |
Inspired by Moschino's irreverent sense of style, Ros and I gave an otherwise conventional dinner jacket a colour injection. Combining masculine tailoring and colour blocking; our sharp suit gets a playful makeover and you get a bias binding master class.
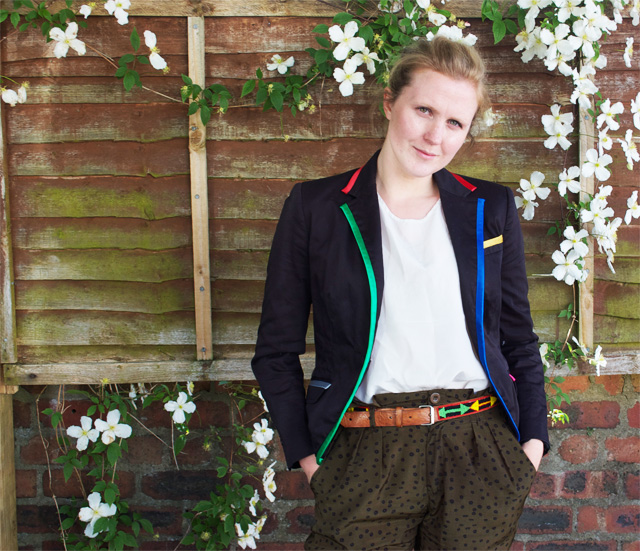
Here’s a double whammy of a kickass project as well as a summary of how to get this technique just right. Don't say I don't do anything for you.
Once you’ve mastered bias binding you will find it uses endless in most projects. Bias binding is cut upon the diagonal (the bias) and can be manipulated to the shape of the garment so don't be afraid of curves. This Fashion Fix is an opportunity to perfect right-angle corners and finishing off those fiddly ends.
You will need:
- A fitted blazer
- Assorted colours of satin bias binding.
- Cotton thread
- Pins
- Sewing machine
- Scissors
- Iron
How to do it:
- Bias binding has pressed in edges that make it easy to follow whilst sewing it on.
- Pin the right side of the bias binding to the top side edge of the jacket collar. Start at one end leaving a 1.5cm overhang of binding. Using the crease of the binding as a guide, sew along the pinned edge using a running stitch. Remove the pins.
- Using an iron, press either end of the binding (the 1.5cm overhang) inwards to create a neat edge.
- Next, still with an iron, press the binding flat and fold under the edge of the jacket. Pin.
- Using a hand needle, sew along the under side of the jacket using a neat slip stitch so that the thread does not show through to the other side of the jacket. Remove the pins.
- Hand sew up each end to neaten with a small blanket stitch.
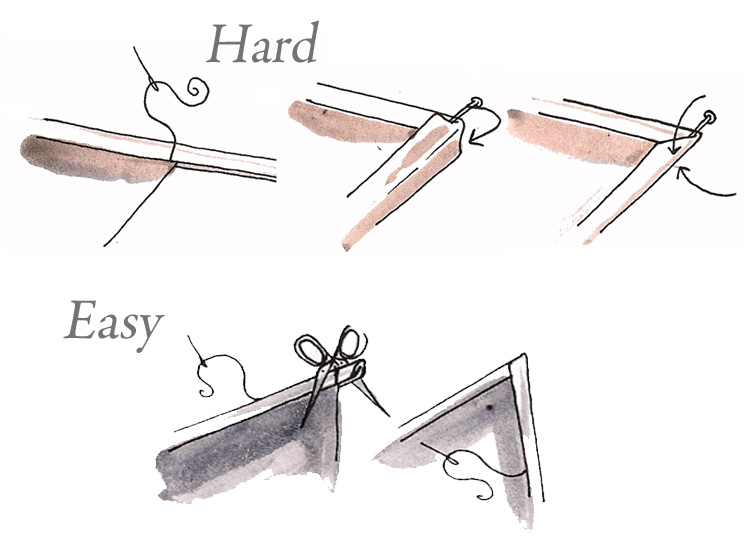
CORNERS: ‘MITERED EDGES’
Turning a corner with bias binding can be tricky but these two ways should help you master that perfect finish.
Easy: Simply sew the binding to the end of your length and cut. Then pin a new piece of binding over the raw edge and start again as you did in step 2.
Hard (but better looking!): Follow steps 1 to 6 of our Binding master class and stop about 1cm before the corner. Fold the binding around the corner and create a mitered pleat. Use a pin to ease this pleat and press with an iron. Finish off the corner with a hand needle.
Make your own Bias binding.
1. Mark out strips of cotton 5cm wide, at 45’ angles across your piece of cotton. Cut
2. Sew each strip to the next to make one long length.
3. Slowly push the cotton strip through a mouse binder and press with an iron as you go.

Bias binding on a curve.
Before folding the binding over the curve, snip small triangles from the raw edge of the binding. This will help ease it round the curve.

Wednesday 12 June 2013
Fashion Fix: Sailor Collar
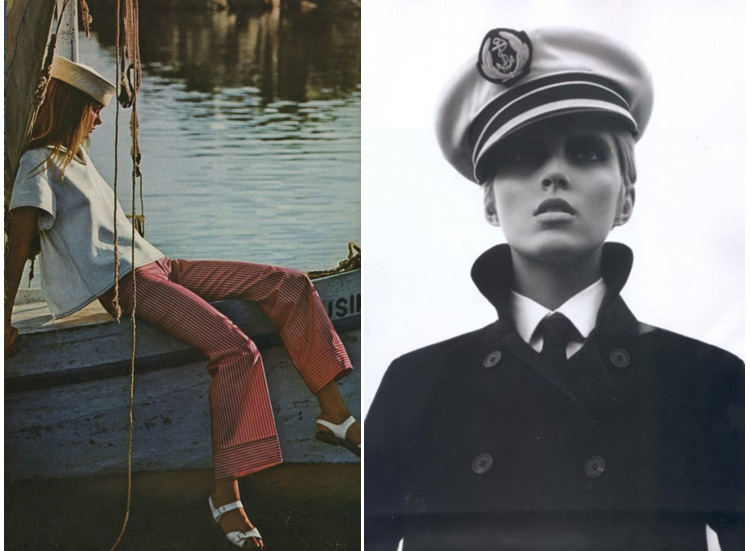
I seem to have been thrust into all things nautical of late...A Sailor Girl Tattoo commission and HMS Bestival Costume Designs have had me trawling through the cliche's online.
It doesnt have to be all 'Hello Sailor!'
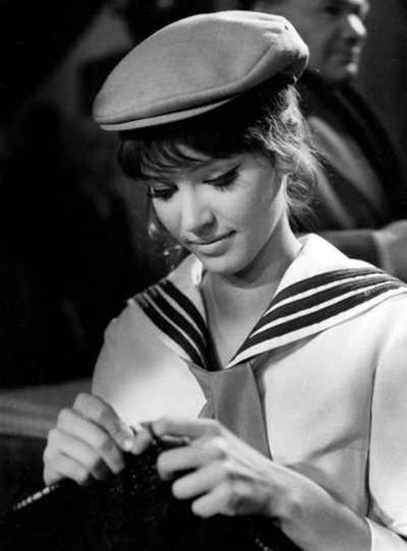
This has got me itching for a chic nautical project. Chanel took the humble Breton Top and made it a wardrobe staple the world over. The humble sailor's collar - ruined by many a hen party dress up - can be a chic, preppy addition to a girl's wardrobe.
So here's a version from Ros and myself.


- 60cm Navy blue cotton
- 3 metre x 1cm white ribbon
- 1 metre x 5cm white ribbon
- Tailors chalk
- Pins
- Scissors
- Sewing machine
- Hand needle and thread
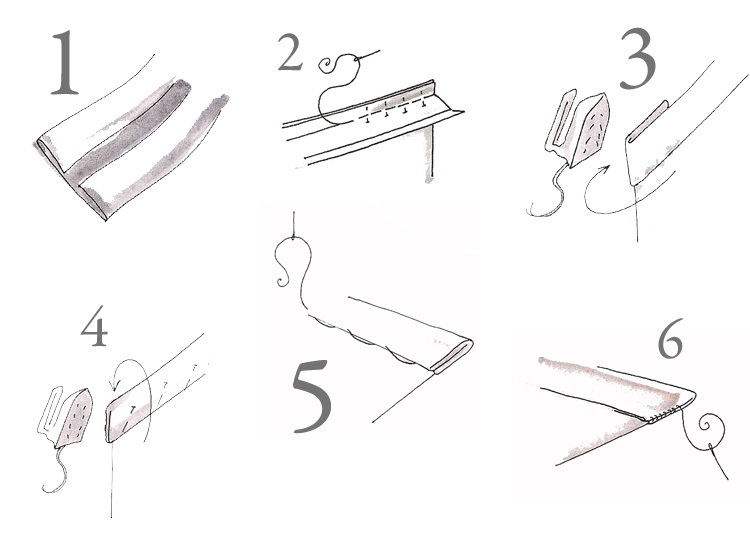
How to do it
- Download and size up the pattern at the bottom of the post. Fold the navy fabric in half with the selvedge running vertically and place the out pattern on the fold of the fabric. Pin. Cut out leaving a 1cm seam allowance.
- Repeat step 1 on the remainder of the navy fabric. mark the ribbon lines onto this piece of fabric. Cut out and lay flat.
- Pin the first line of ribbon all the way round this collar. Use a pin to help create a neat twist at each corner.
- Sew using a running stitch along each side of the ribbon. Repeat with the second piece of ribbon.
- Take the wide ribbon and cut in half. Sew each piece of ribbon to either side of the front of the collar making sure the ribbon sits up the collar.
- With the ribbon side facing inwards, pin the 2 collar pieces together and sew all the way round leaving a 6cm gap at the back of the neck.
- Pull through, press and using a hand stitch, sew up the gap.


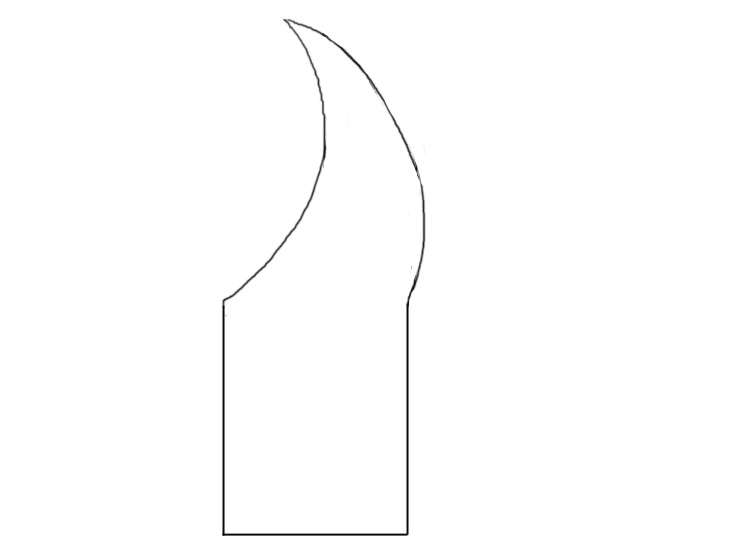 |
| sailor collar pattern |
Subscribe to:
Posts (Atom)